Bicycle Maintenance & Repairs while Bike Touring
Common bicycle problems while cycle touring, emergency road-side repairs, and maintenance tips for bicycle touring.
Emergency Repairs on a Bike Tour
Spoke Emergency Repair Kit
From discussions with other cyclists and reading numerous journals it sounds like one of the most common problems experienced during a bicycle tour is broken or damaged spokes.
The problem is often attributed to carrying too much weight on rims and spokes that aren’t designed to carry the load, poor maintenance habits such as ignoring an untrue wheel too long or hitting a nasty and giant pothole at the wrong time and speed.
Regardless of how it happens, it has to be fixed. If you ignore a broken spoke then over time the remaining spokes will break leaving you with a loaded bike with a broken wheel.
I take some Spoke repair parts along on tour with me. My kit consists of the following:
- Four spare regular spokes
- Two spare drivetrain side spokes
- Two Fiber Spokes
- Spoke wrench
- Stein rear-cassette remover
To some people this equipment might seem like overkill especially since I’ve never had to use it. During my Round Lake Huron tour I met up with two Cross Canada cyclists who had plenty of tubes, tire patch kits and even spare tires but not a single spoke related repair item. At our last meal meeting place, before we parted ways, I gave them a Fiberspoke “just in case” since I already knew how common spoke problems can be from talking to others.
Later I heard from them via email that within four days of our parting, four spokes broke on the rear wheel of one bike. This happened in one of the more remote areas of their tour. After setting up the Fiberspoke they were able to ride through 75 km of forest to reach the next town with a bike shop where they replaced their spokes.
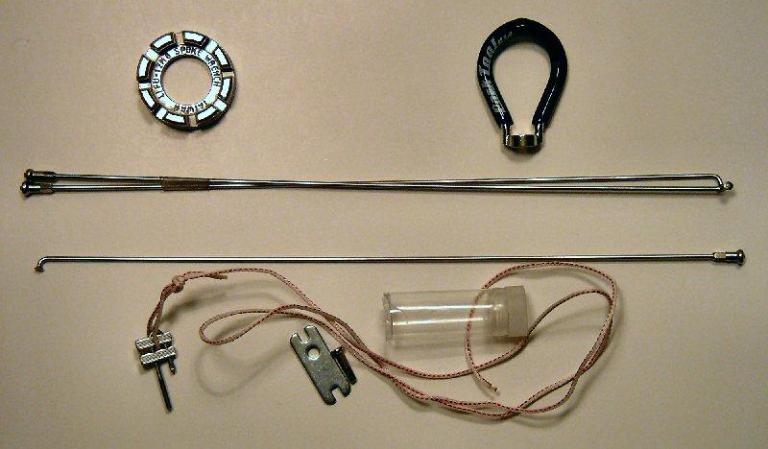
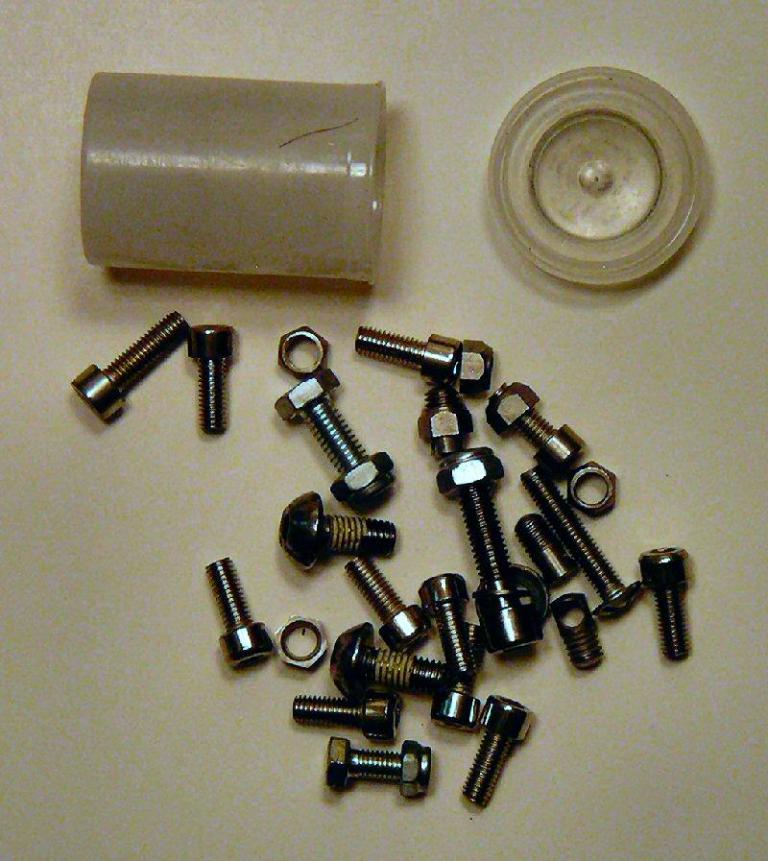
A picture of most of the parts that make up my spoke repair kit. There are two spoke wrenches, four regular spokes, two drivetrain spokes and a Fiberspoke. The Fiberspoke packs away into the small cylinder shown in the picture.
The Fiberspokes have the advantage of being lightweight, small, relatively inexpensive and requiring almost no tools to use. You don’t need to remove the rear cassette or anything else to get the bike working again. Often you can reuse the Fiberspoke many times as well. I like to think of the Fiberspoke as something I would use to allow me to finish the day’s ride so that I can do a more permanent repair in the relative comfort of my campsite for the night although there have been reports in various tour journals of people successfully using fiber spokes to complete an entire tour.
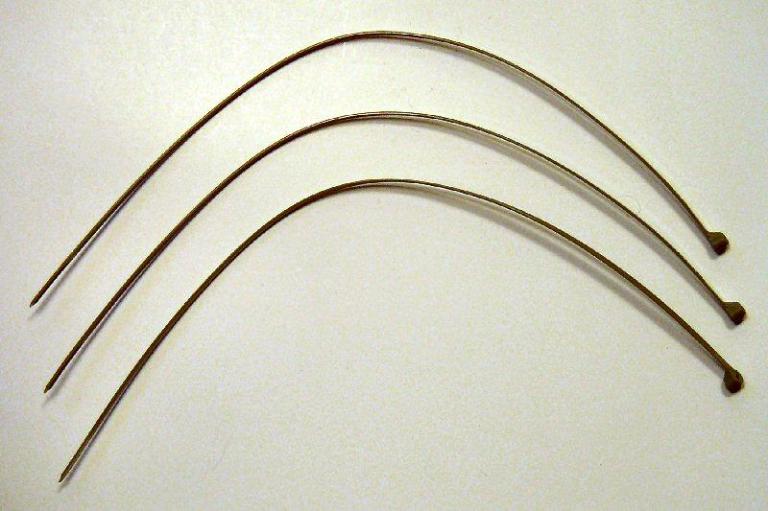
More permanent repairs require having the correct spokes for your rims. These spokes are generally not too expensive and with the number, you are likely to carry they will not add much weight. The hardest part about carrying them with you is that they are somewhat long in length making packing them a bit awkward.
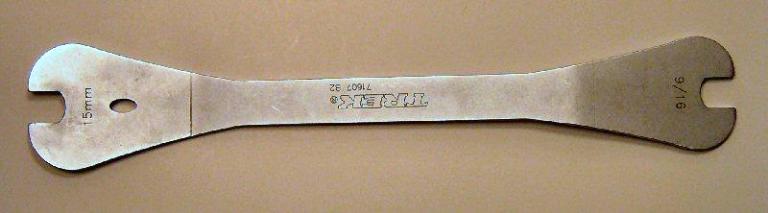
A spoke wrench is needed to help with replacing the broken spoke. I initially carried the round spoke wrench shown in the first picture until I temporarily misplaced it just before leaving on a tour. I replaced it with a spoke wrench that’s the exact size needed by the spokes. The rounded wrench supports many different spoke sizes making it an excellent general-purpose tool but one mechanic that I spoke to said that it had more of a tendency to round spoke ends than did the more specifically sized wrench that I use now.
Should the broken spoke be a rear-wheel drive train side spoke then the repair job becomes trickier due to the need to remove the rear cassette in order to replace the spoke. There are heavier and bulkier tools available that are used by bike shop mechanics to do this but the extra weight and storage requirements make them less desirable to carry during a bicycle tour.
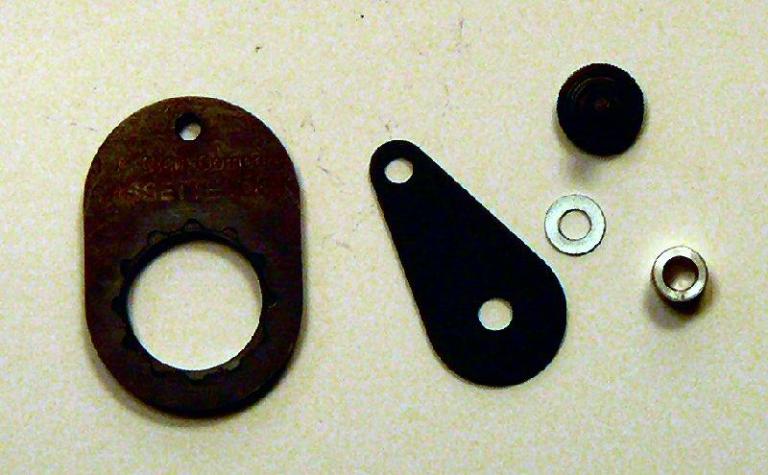
Thankfully there is a device called the Stein rear cassette remover. This device is compact and lightweight making removal of the rear cassette a relatively easy operation to perform.
Of course, having all these tools available is really useless unless you also have the knowledge of how to use them. I will be adding more pages describing how to do these things but a very cost-effective addition to your spoke repair kit would be some hands-on lessons with the mechanic in your local bicycle shop. Just remember that a broken bike in the middle of nowhere isn’t likely what you want especially if the broken part is something as easily repaired as a spoke and pretour lessons take little time or cost.
While you are meeting up with the bicycle mechanic have them show you the basics of trueing a wheel. On tour, you are not likely to have a trueing stand with you but you can often use the brake pads as a rough trueing guide provided you understand what you are doing from previous experience.
Drivetrain Related Emergency Repair Tools
During my Round Lake Erie tour, I experienced multiple problems with a very significant part of the drive train, the right pedal. I broke not one but two pedals in very different places during that tour. The first pedal likely broke from lots of use and a lack of proper maintenance and lubrication. The second pedal broke after less than two days of touring.
I learned from these adventures in many ways. The first lesson is that you really can’t use zip locks to help create a temporary fix for a broken pedal when it’s the main attachment point that’s broken. The second lesson was to take a second set of pedals and some maintenance gear with me during my next tour. I’ve been doing so ever since.
On this page, I will mention some parts that I use for drivetrain maintenance. I don’t take all of them with me on tour although most do come along. I’ll specify what I don’t take in the remainder as I describe each part.
Grease Gun
My first set of pedals likely disintegrated from a lack of lubrication and proper maintenance. I purchased another set of Eggbeater pedals to replace the ones that had broken. This new set had a feature lacking in the original pair, the ability to inject new grease into the pedals.
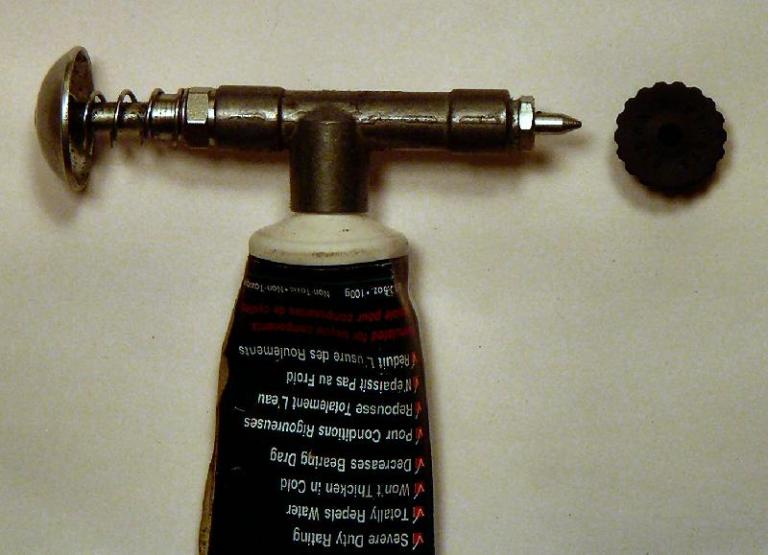
Bob, my fellow touring buddy showed me a handy grease gun that he picked up from a local bike shop. This grease gun screws into a tube of grease and allows you to easily service the pedals from almost anywhere. Service consisted of simply removing the end cap from the pedal, attaching the piece to use for injecting the grease, placing the grease gun into the adaptor and filling the pedal with grease until it comes out clean. I experienced no problems with these pedals during my Round Lake Huron tour. I will continue to take this gear with me on tour.
Pedal wrench
I haven’t taken a pedal wrench on tour and I hope that I won’t need to. I know that some people carry them on tours where they have to take the pedals off to ship the bike via airplane, train or bus. The Eggbeater pedals I use now connect using an Allen key. My only concern is that I will someday have problems removing a set of pedals with an Allen key due to a lack of enough leverage. (One advantage of a full-sized pedal wrench is that it makes removing stubborn pedals from a bike very easy due to its increased leverage from its extended length).
Chain Tool
I’ve broken a chain while cranking up a heavily snow-covered hill during a bike commute to work. I’ve also broken the chain numerous times while mountain biking but I have so far not broken a chain while on tour. There have been a few reports of broken chains in touring journals.

Currently, I have an Allen Multi-use tool that includes a chain tool that I usually take on tour. At home, I use a Park Chain Tool for any chain work I do from removing the chain for cleaning to putting a new chain on the bike.
It is important that when purchasing a new chain you find out if the pins in the chain can be reused after a chain tool has worked with them. In some cases, the pin has to be replaced. One brand of chain that seems to require new pins is Shimano. Other chains have Masterlinks that allow easy removal and replacement of a chain without needing a chain tool. Of course, if this type of chain breaks on tour then you still may need a chain tool.
Emergency Repair Kit odd’s and ends
This section discusses tools and spare parts that I like to carry with me on tour and haven’t covered in any of the other sections.
Spare bolts
It would really suck to get three-quarters of the way through a tour only to discover that you’ve lost a critical bolt. In my case, this happened to me during my Round Lake Huron tour when I lost one of the bolts in my rear rack. Luckily I was carrying a film canister with some spare bolts.
While this worked well to fix the problem I encountered another trick that experienced bicycle tourists use is to replace as many bolts as possible on the bike with one common size. An example of this technique is replacing water bottle cage bolts with longer bolts and washers that can be used elsewhere on the bike should a problem occur.
Ziplock ties
During my Lake Erie tour, ziplock ties were successfully used to keep one of my Vaude rear saddlebags attached to the rack when the attachment mechanism failed at a bad time and place. Later on, I removed the ziplock ties and fixed the problem with the attachment mechanism. Plastic tie wraps or zip-lock ties are inexpensive and very useful for helping to temporarily fix problems that occur during a tour.
Deraileur hanger
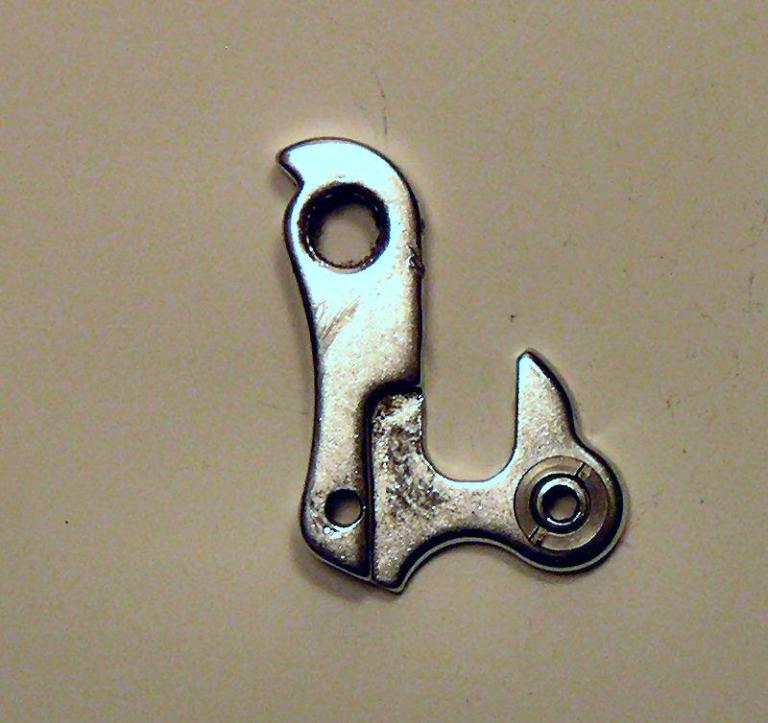
This is an item that is most likely to be needed during an offroad tour although having a fully loaded road touring bike fall over in a way that damages the derailleur hanger is possible. When a derailleur hanger is bent it often causes problems with shifting especially for indexed shifting systems. With some types of shifters, you can sometimes work around the problem by using friction mode instead.
Multiple Function Tools
People often consider taking a multiple function tool along with them during a tour. I did this during both of my lake tours.
This kind of tool usually includes a number of helpful parts that could really aid you in an emergency repair situation. The tool shown in the picture includes a chain tool, numerous Allen keys, two tire levers, a couple of screw drivers, a small pedal wrench and a knife as well as a number of other functions.
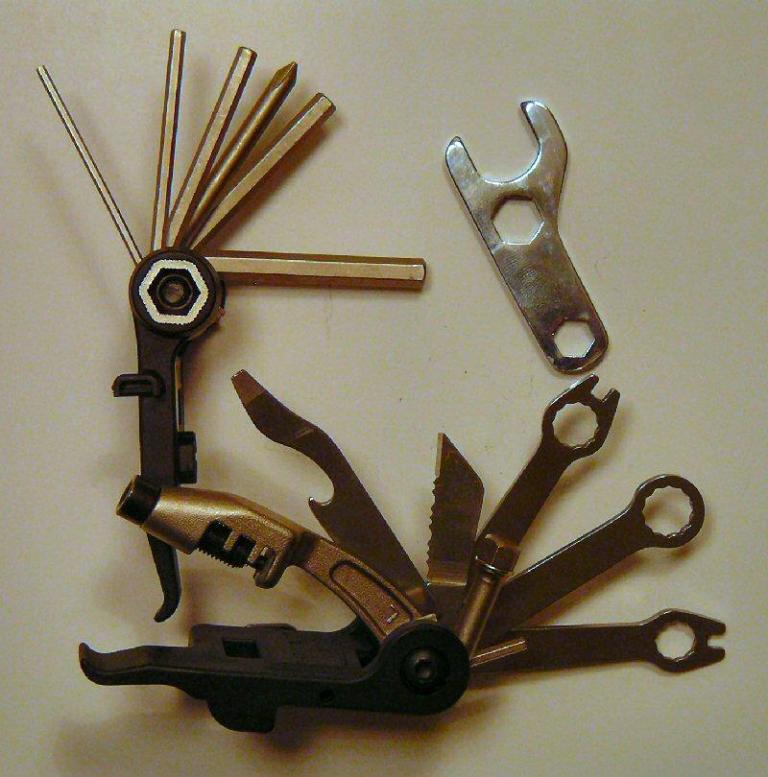
All of this functionality has the potential to weigh more than the weight of just carrying a few specific tools that you will need with you during your tour. If you carefully review the number of Allen key sizes that you actually have on your bike and standardize on as few sizes as possible then you might be able to go from carrying 5 or more Allen keys as shown in the multiple function tool picture to carrying only one, two or three of the hex keys that you actually need.
Another example is the chain tool. The chain tool shown in the picture works fine and I have used it very successfully to fix a broken chain while mountain biking in the woods. I also have a Park Chain tool which I find much more comfortable to use primarily because it is a larger size that feels better in my hand. Either one works fine to fix a broken chain.
Looking over the rest of the tools I always carry separate tire levers with me anyway since I like to use three when working on the bike. I am unlikely to use the remaining tools.
A multiple function tool like the tool shown above can really be useful and helpful if it’s the only tool available to you or if you want to carry a single tool that has lots of functionality to help you quickly resolve a problem. I carry one while mountain biking for exactly that reason. I cycle with others so I never really know what tools I might need in order to help them out.
During a bicycle tour, most cyclists end up trying to think about how to carry less weight. One easy weight reduction is to carry only the tools that you actually need. With a bit of looking and careful planning, you should be able to carry high-quality tools that are comfortable to use while carrying less weight than a multiple function tool.
Breaking or repairing the chain using a chain tool
I’ve never broken a chain while touring but based on some very early results from the Broken gear during a bicycle touring adventure poll it appears that some people have experienced this. I have broken my chain twice while off-road mountain biking and once while Icebiking during my winter commute.
Last week my friend Jakub experienced a chain break during his commute home. Since I was riding with him I had the chance for a quick refresher course in repairing a broken chain.
Even if you never break a chain during a tour it’s still a useful skill to have especially if you like to remove your chain and soak it in some chain cleaning material before reinstalling it back on the bike.
At the upper left is a picture showing a Park Chain tool and a short length of practice chain. The practice chain was obtained at my favourite local bike shop by simply asking if they had some spare chain lying around. It turns out that most shops do have extra so it’s well worth asking for some so that you can practice your skills in advance.
The Park Chain tool shown in that picture is my preferred tool for working on my bike chains. There are numerous chain tools offered by a large number of manufacturers. Most have very similar features but differing levels of quality so it’s well worth looking around to find one that matches your needs.
Breaking the chain
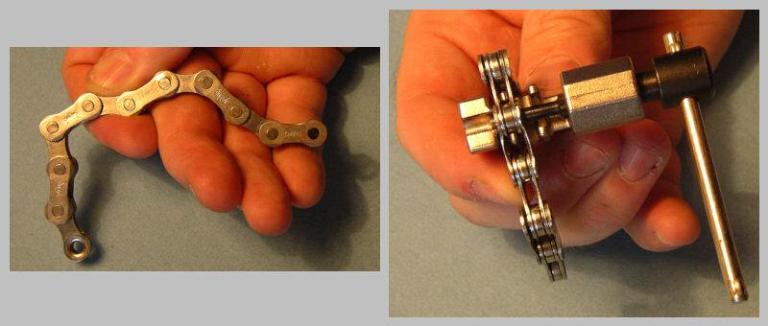
The picture above has two images related to breaking the chain. The leftmost image shows a picture of a SRAM chain. Notice the round circles visible in this picture. These circles are the actual pins that hold the various links together.
The second picture shows the chain placed in the chain tool. Notice that although there are two places where it appears that the chain could be placed in actual fact I have placed the chain at the rearmost position.
The two positions serve different purposes. I use the rear position to push the pin in or out of the chain. The front position is used to remove tightness from the chain once the pin is placed back in the chain.
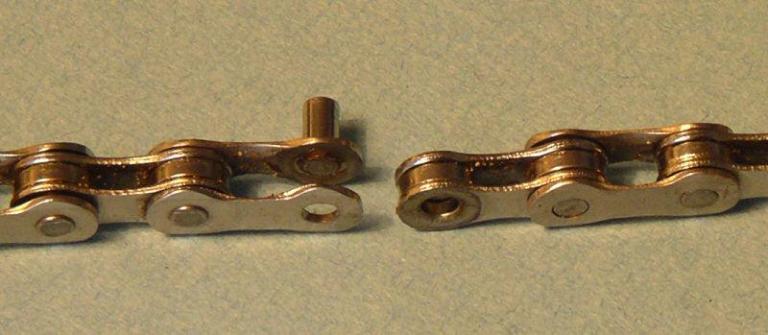
The picture to the right shows the chain in two pieces following the removal of the pin. Notice that I have purposely left the pin attached to the chain. I do this even for chains like those made by Shimano where you need to insert a new pin rather than reuse the existing one. It is vastly simpler to repair the chain later if you have a bit of pin already in the chain when you need to start pushing the pin in. If you have to replace the pin with a new one then you can easily push the old pin out using the new pin and the chain tool.
Repairing the chain
The picture below contains two images showing the chain being put back together. This is a kind time to once again mention that some chains require you to replace the old pin with a new one whenever you do this operation. One brand where this is often the case is Shimano. When in doubt ask at your local bike shop.
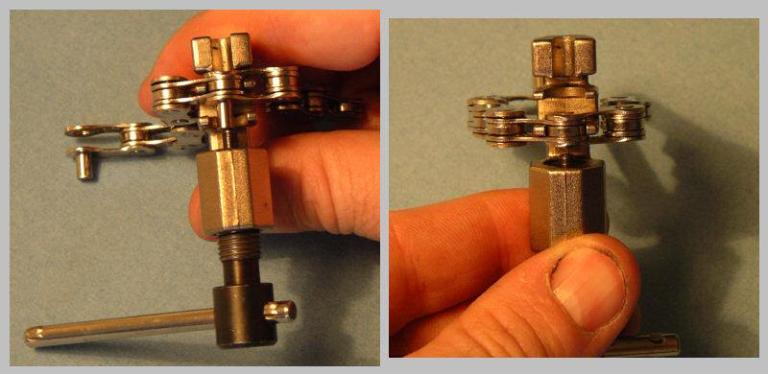
In the first picture, the chain is once again in the rearmost slot and I am pushing the pin back into the chain. When doing this I am careful to make sure that I only push the pin through so that it is flush with the other side of the chain.
Following the insertion of the pin, the chain will often be quite tight in the location where you inserted the pin. It is important that you remove this tightness so that the chain can flow properly through the entire drivetrain without a problem. The easiest solution to this is to insert the chain in the front slot and once again press against the pin. This action will spread the chain apart and remove the tightness in the process.
Double-check the chain to make sure that the link is still firmly embedded in the chain. If this is the case then your repair is complete.
Keep in mind that if you had to remove one or more links then the chain is now shorter. You should use caution when using your lowest and highest gears. With the chain being shorter do not be surprised if you can not use some of them until you replace the missing length.
Mini-tools for Lightweight Bicycle Touring
Many people carry mini-tools along with them during a bicycle tour. These tools often have some way of allowing you to work on your chain. You should definitely try out the mini-tool using a piece of practice chain prior to your tour so that you can make sure that it works the way that you would like it to.
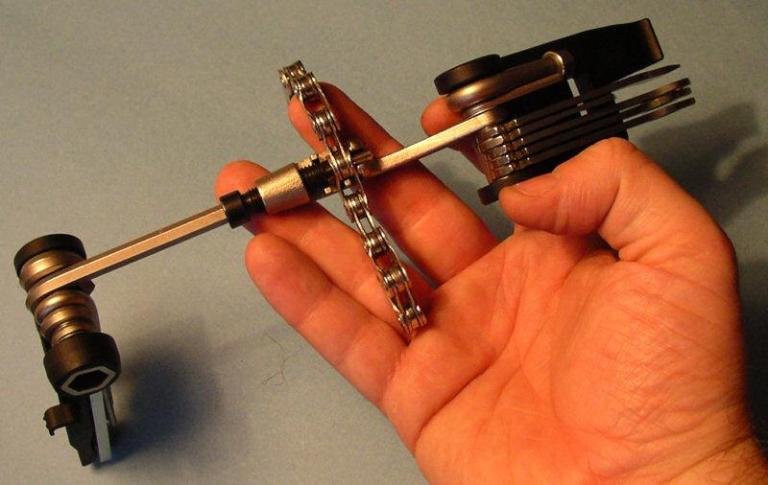
The picture to the left shows me using my Allen mini-tool to work on a chain. As you can see there is a lot more bulk to the chain tool when using this option. The important thing is that with this tool I can indeed repair or break a chain. It is worth mentioning that I find the process easier and much more problem-free when using a dedicated chain tool like the Park one shown earlier in the article.
For people who buy a ‘new’ chain tool or rejuvenate an old one, I learned on the road that there is a difference between a chain tool that is 9-speed compatible and one that isn’t.
I can tell you that even today, some shops sell 7/8-speed chain tools. The difference lies in the section used to remove the tightness between links. If you have a 7/8 speed chain tool, the chain won’t slide in there. Short of exchanging the tool for a new one, a very simple solution is to file slightly the two teeth upon which the chain sits but do it at home and not on the road!