The Best Gearing for your Touring Bicycle
Choosing a good drivetrain for your touring bike is an important task. You need granny gears as well as smaller, fast gears. The heavy load makes it hard to climb uphill, but it also helps to keep your momentum when going fast.
A very common question on most bicycle touring related forums concerns selecting the proper gearing for a bicycle touring bike.
There are really two answers that are almost instantly heard when the question is asked.
- You need to select the gearing that works best for you
- Most stock touring bikes come with gearing that is too high for loaded/self-contained touring although that same gearing generally appeals to club riders to whom the majority of these bikes are sold.
I look at it this way. If I am going down a hill and the speed reaches the point where I can no longer pedal then I have a rest and coast down the hill or I turn the pedals slowly to keep blood flowing in my legs.
On the other hand, if I am climbing a hill and the resistance is too strong to continue without a lower gear then I have very few options short of a long walk uphill pushing the bike.
I’ve never heard anyone complain about having too low of gear available but I’ve certainly heard people talk about having gears that were too high!
So what can you do if you have a bike with gearing that is too high?
The first thing I did was to find the gear that I liked to use the most on tour as well as the highest gear that I used regularly during that same tour. Of course, to be a useful exercise it is important that your route includes both ascents and descents and that you carry a normal touring load.
Here are some of the questions that I ask myself following the ride.
- Was my lowest gear low enough to allow me to spin my way uphill without causing a bad burn in my legs?
- Was my highest gear high enough to allow me to cruise down the road at a reasonable speed or was I always wishing for another higher gear?
- Was the spacing between the various gears good or did the test reveal large jumps that were quite irritating?
- Would I be comfortable with this gearing over the course of a hilly eight-hour ride?
Once I have this information then I have the basis to decide if I really do need to make changes.
Whenever I am considering gear changes I like to use something called a Gear Calculator. With the gear calculator, it is easy to determine how big of a change in gearing you are considering.
There are many ways to view gearing information. Although somewhat dated I tend to use Gear Inches as my unit of measurement. Gear inches were originally determined by measuring the circumference of the large wheel on the old penny-farthings so the number that you see in the calculated result shows the penny-farthing wheel equivalent for that gear.
When using the calculator I need to enter information about the crank length, tire size, front cranks and the rear cassette. Here are the answers I would have provided for my original Trek 520.
- Crank length: 170mm
- Tire Size: 700c X 32
- Front cranks: 52/42/30
- Rear cassette: Shimano (as), nine speed, 11-32
This yields the following results: (Each column represents the gearing for that particular crank so in this example column one is for the 52 front, column two is 42 and column three is 30).
| 52 | 42 | 30 |
|---|---|---|
| 127.6 | 103.1 | 73.6 |
| 108.0 | 87.2 | 62.3 |
| 93.6 | 75.6 | 54.0 |
| 82.6 | 66.7 | 47.6 |
| 70.2 | 56.7 | 40.5 |
| 61.0 | 49.3 | 35.2 |
| 54.0 | 43.6 | 31.2 |
| 46.8 | 37.8 | 27.0 |
| 41.3 | 33.4 | 23.8 |
What this chart tells you is that my highest gear is 127.6 gear inches while my lowest gear is 23.8 gear inches. In practical terms, I rarely used even the 93.6 gear inch gear let alone the much higher ones. I also found myself wishing for lower gears on steep hills. The hills were still doable but not as easy as I wanted! Another thing to note is that the difference between gears ranged from 13 to 18 per cent meaning that some gears had a much bigger jump than others making it harder to decide to go up a gear or not.
I have made modifications to my gearing since picking up the bike so my answers are different now:
- Crank length: 170mm
- Tire Size: 700c X 35
- Front cranks: 42/32/22
- Rear cassette: Cyclotouriste-13, nine speed, 13-34
This yields the following results:
| 42 | 32 | 22 |
|---|---|---|
| 87.8 | 66.9 | 46.0 |
| 76.1 | 58.0 | 39.8 |
| 67.1 | 51.1 | 35.2 |
| 60.1 | 45.8 | 31.5 |
| 54.3 | 41.4 | 28.5 |
| 47.5 | 36.2 | 24.9 |
| 42.3 | 32.2 | 22.1 |
| 38.0 | 29.0 | 19.9 |
| 33.6 | 25.6 | 17.6 |
In this example, the highest gear is 87.8 gear inches while the lowest is 17.6. I can’t recall ever wishing for a higher gear and I’ve certainly come to appreciate the three lower gears that I have to choose from compared to before. As an added bonus the gears are much closer together too with only a 10 to 15 per cent difference between gears. This means that often I discover that my speed has increased slightly and I can easily switch to a higher gear. Over the course of a day, this can make a tremendous difference as you fine-tune your pedalling and gain that little extra bit of performance and comfort.
When you compare the numbers for these two setups the following things should be visible.
- The highest gear has dropped significantly along with the lowest gear.
- The spacing between gears is also much more even so no gears suffer from large jumps.
This makes it quite easy to shift up or down a gear to try to obtain the optimal gearing for the terrain that you are going through.
I also use this bike for everyday commuting. In that mode, the loads are lower and I can easily push my highest gears. My current gear range is such that I seldom wish for one higher gear. About the only time is when I am racing a buddy and feel the need for a slightly harder push to drop them behind.
Economics
The problem with the setup I’ve shown here is that I did it the expensive way. I basically accepted the stock bike as is the day of purchase and then gradually upgraded components as time passed and my knowledge level of what I needed has increased. This means that I gradually upgraded the rear cassette, front derailleur, front cranks and bottom bracket. I ended up with a very good setup for me but it cost money. If I could go back and do it again I would specify the lower gearing upfront assuming that I planned to do fully loaded/self-contained touring.
Has the quality of my tour improved?
The quality of my touring experience has definitely improved. With my extremely low gearing, I haven’t found a hill yet that I can not eventually climb even with a full load of stuff. Not only can I climb the hills but after doing so my legs still feel energetic.
For me making the gearing changes was definitely the right move and one that I wish I had done the day I purchased the bike. Since I already knew at that point that fully loaded/self-contained touring was in my future it would have been the most cost-effective way to do it.
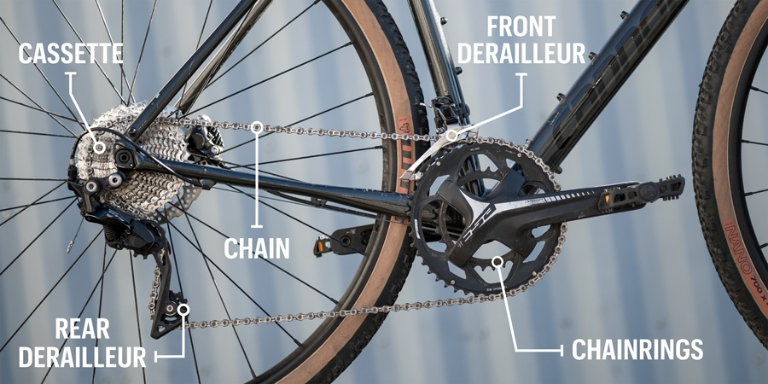
Drivetrain friction points checklist
This list is to showcase the number of components of the drive train that could be suffering from increased friction thereby robbing you of your forward motion.
- Front and rear derailleur limit screw adjustments
- Rear derailleur pulleys lubrication
- Rear derailleur angle adjustment
- The closeness of front derailleur cage
- Parallelism of front derailleur cage
- Arc of front derailleur cage follow chain wheel
- Shifter cables integrity
- Shifter cables length
- Shifter cables tautness
- Shifter cables routing
- Shifter cables lubrication
- Shifter tightness
- Shifter lubrication (when applicable)
- Bottom bracket spindle correct length
- Bottom bracket spindle bolt tightness
- Chain type (width, etc)
- Chain length
- Chain lubrication
- Chain wear
- Rear-axle fore-aft placement
- Rear-axle angle in rear dropouts (up, down, front, back)
- Freewheel cog wear
- Freewheel cog orientation (front, back)
- Freewheel tightness
- Freewheel lubrication
- Chainwheel wear
- Chainwheel bolts tightness
It’s a long list and it gives plenty of room for thought on one of those days when you are pushing against a relentless headwind and wondering how you could improve the efficiency to get that extra little bit of forward motion.
Don’t let the apparent complexity overwhelm you. Most of these items are easy to adjust yourself with a bit of practice. Alternatively, if you don’t feel up to it then any good bicycle shop should be able to look at this list and help you out!
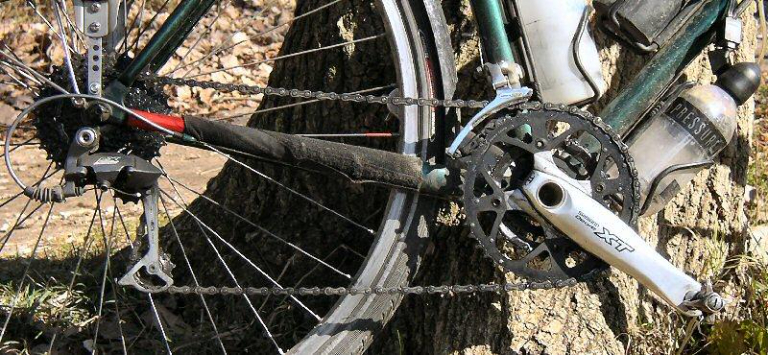
Protecting your derailleur from an accidental twist
Derailleurs hangers are a relatively fragile part of a touring bike. Although it appears from the recent survey that damage occurs infrequently when it does occur it can really mess up your ability to shift rear gears successfully.
One advantage of bar-end shifters is that you can easily switch from indexed to friction mode and manually change the gears that way making this problem something you can often live with until you reach a shop.
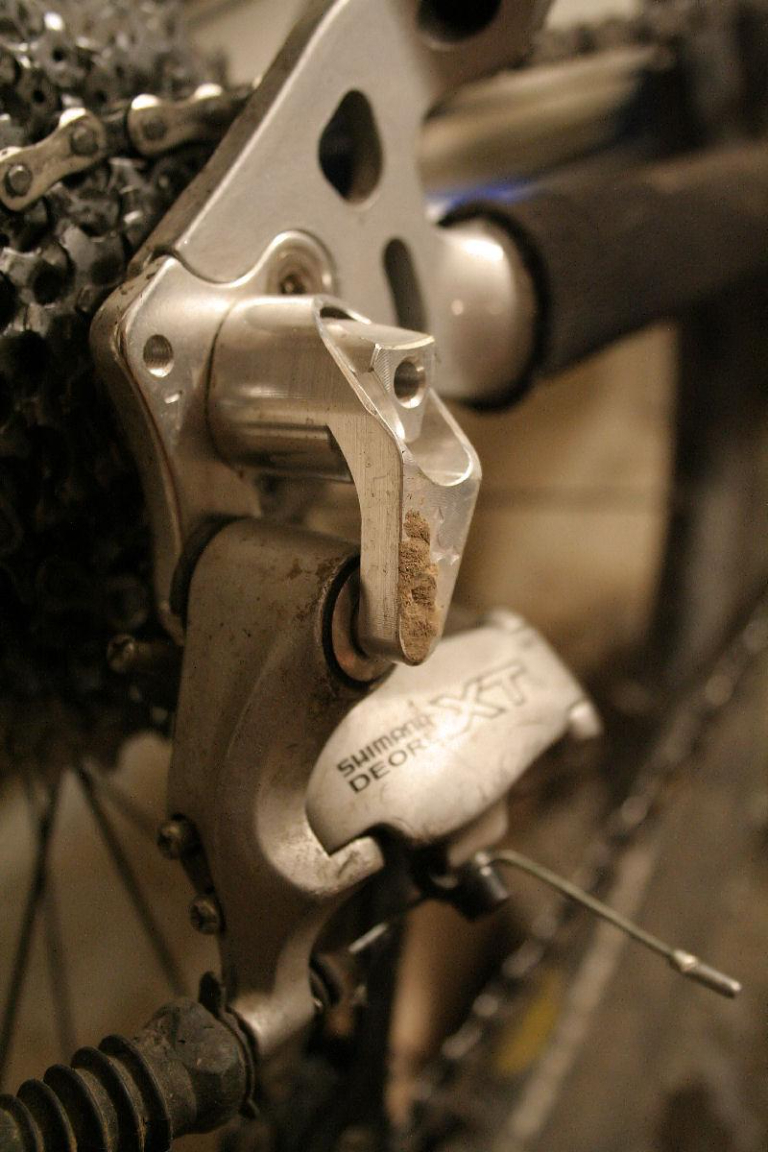
Another alternative is to install a derailleur protection device like the one shown here in the picture. They are commonly used by off-road singletrack riders who crash more frequently while riding over technical terrain.
If you typically tour on the road then I suspect that the most likely cause of a bent hanger will be accidentally dropping your bike on its side after leaning it against a tree or possibly having an extremely bad wipeout on the open road. Both occurrences are hopefully relatively rare for the average cyclist.
Installing this device is simple. Remove the current wheel nut that your quick release attaches to. Replace it with the device and presto you have a derailleur protection device.
The picture on this page shows the device with a bit of dirt on it. The dirt came from a hard, helmet smashing wipeout that occurred while riding off-road at high speed. Despite wearing helmets for a long time this represented the first time my head actually hit the ground. Thanks to the helmet and the protective device on the derailleur the bike and I both came out fine!
Although I do have this device installed on my off-road bike I haven’t installed one on the touring bike yet.
Differences in crank length
Recently while riding my fixed-gear bicycle I experimented with crank length. With a fixed gear, you have only one gear and you have to pedal constantly all the time. This means that when you go around a corner you have to pedal and as a consequence, it is possible to hit the pedal on the ground during the turn. Hitting a pedal on the ground can have a major impact on your cycling day so it’s something you try to avoid as much as possible.
My first set of cranks on this bike was 175 mm in length while the new set is 165 mm. Even though the testing was performed on a fixed-gear bike it was useful because it gave me a chance to really see first-hand the difference that 10 mm makes when riding a bicycle regardless of the type.
The 175 mm cranks had the advantage of giving me more leverage when climbing hills. It seemed to be easier to go uphill as long as I maintained forward momentum. When descending I found that my hips ended up moving further and pedalling smooth circles was much harder.
The 165 mm cranks made pedalling fast downhill incredibly easy in comparison. On flat ground, I also found that I was pedalling more smoothly without moving my hips as much. Uphills were indeed harder but not to the point where it was impossible to ascend.
I should also mention that I’ve been told that knee problems might be caused by extreme angles when pushing the pedals. The 175 mm cranks put the knees at a much greater angle than do the 165 mm ones. I don’t know how true this is but it is something worth looking into. It’s likely also worth noting that many mountain bikes come with 175 mm cranks and people seem to use those successfully in more difficult terrain than that encountered during the average bicycle road tour.
I found this recommendation on the internet:
Measure the distance from the top of your femur to the bottom of your bare feet. Figure out what 18.5% of that measurement is to determine your optimal crank arm size.
So how does this relate to my bicycle touring bike?
My touring bike has 170 mm cranks so it’s set up mid-way between the two cranks I’ve used giving me slightly more leverage when climbing while also giving me the benefit of being able to spin easier circles while pedalling.
